Happy Monday lovely readers!
What a great party we had! I did have a few moments to look through some of the amazing projects that were linked up. Can't wait to look through the rest of them.
Thank you to everyone who participated in the Ramsign giveaway. What a beautiful House Number Sign one lucky blogger will be shortly receiving.
And NOW FOR LE WINNER!
Kerry From House TalkN. Kerry has a hilarious blog, all about HOUSES. Congrats Kerry, I am sure you will love your new sign to add to your gorgeous home.
Now for Le Sewing Stool
I think back in the day, Singer must have made 1,000's of these little stools to go with their old fashioned sewing tables.

I have one in my bedroom, awaiting a REDOUX.
This one was OLD
SACRE BLU!!!!
No before picture again. Imagine a lacy trim homemade jobber with frilly fabric to match.
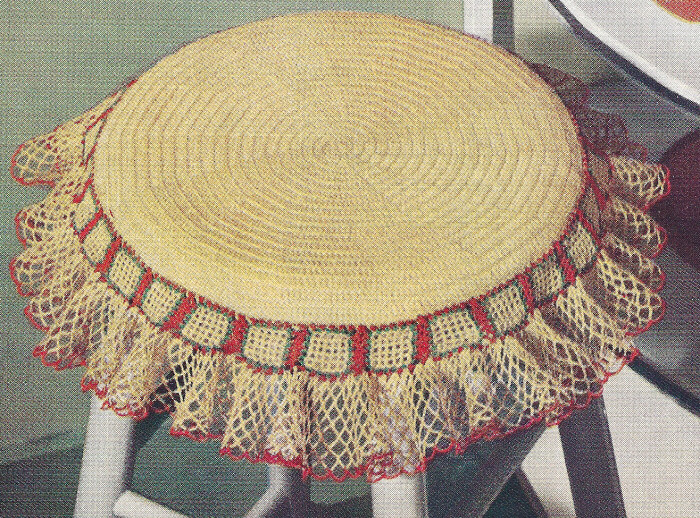
When I pulled out the staples, I found a hand made crochet cover under the fabric, and beneath that, it was stuffed with Horse Hair.

I love that it even had an "ingredients" label.

Someone had gone to a lot of work crocheting the sweet little cover, who was I to discard it? It had sat happily unknown under the previous piece of fabric, so I thought I would carry on the tradition. It stayed right where it was, acting as a nice liner.
Now to cover the pad:
I cut fabric I had leftover from a previous project. It is an indoor/outdoor fabric. It feels like regular upholstery fabric, but with the added benefit of being dirt and stain resistant. I recommend checking Ebay for fabrics.
Back to the project....
Lay the pad upside down squarely on the fabric.

Get out your stapler, I like to start with each side, right in the middle and do all four sides by doing each opposing side, so there is even stretch of the fabric. Repeat until you have it securely fastened. You now have four corners to deal with. Use a little gift wrapping skill here. Pull up the corners, tucking the sides in and staple in the middle, again do the opposite corner. Repeat until corners are securely fastened.

Be sure to give yourself plenty of fabric to stretch. (I barely made it....cheap I am!)
You can stop here, or you can be all professional and add what is called the "Dust Cover". This is a very thin nylon fabric that you will find on every piece of professionally upholstered furniture. It protects the furniture from getting yucky dust up into it's private parts....It also helps a piece look "finished", so you don't see all the mistakes inner workings of the piece.
This stuff is thin nylon and will melt on your iron if you go any hotter than the lowest setting. I cut a square slightly larger than the cover, and allowed for area to fold it under to make a seam. You can secure the dust cover by either folding the seam under and stapling into place, or you can use this:

I purchased this at Joann's Crafts, but you can find similar products many places. This stuff is good for paper too. I recommend wearing gloves for this part. Spray evenly where you want the fabric to stick. Wait a few seconds for it to become tacky. It should look like this:

Then just by folding it under, gently press the nylon into place and repeat all around the edges.
Now I could have stopped there, but as we all know, details make the difference. I added some black gimp I had on hand. Using a hot glue gun, simply work your way around the perimeter.

When you get to the end, I like to fold a little piece under, and secure it flush with the already in tact piece. This way, you do not have any hanging threads. (Also, you get a shot of my gorgeous hands)

I painted the stool in some flat black paint I had on hand, used Cece Caldwell's Wax, there were no fumes because their wax is all natural.
And Voila, FINIS!


Sharing this project at these lovely blogs:


cute! love the yellow polka dot fabric!
ReplyDeleteWhat an improvement from the doily and the horsehair!! Love the cute fabric choice too. I have a couple of chairs that need a simple seat upholstered but haven't found the perfect fabric - need to get cracking!
ReplyDeleteOh and can I join you in Hawaii and Tahoe when you retire!?
Kelly
I love what you did with the stool. It's fun and contemporary looking.
ReplyDeleteI think it's identical to mine that I painted white and distressed and then using turquoise linen and a bit of lace I made a Union Jack with a heart in the middle of it for the cushion. It was a brain wave that I suddenly had and it only took a few minutes to make. Very fun. I love small pieces of furniture that you can be really creative with.
Hugs, Cindy
What a transformation!!! That looks great!
ReplyDeleteI would like to invite you to link up at Fabulous Friday going on now.
http://littlebeckyhomecky.blogspot.com/2012/03/fantabulous-friday-2.html
Oh - this is so cute. Love the fabric.
ReplyDeleteThanks for the tweet!
~ robin
Super cute! I LOVE THE POLKA DOTS!!!!!!!!!!! :)
ReplyDeletehttp://dixie-n-dottie.blogspot.com/
Thanks for sharing, I love the yellow color, it's beautiful! Project well done! Sharing this on facebook later today, thanks for linking up to the RRR party!
ReplyDeletegreat redoux on the stool karen!
ReplyDeletegail